Motivation
In this guide we will set up a lab which contains several Fortinet products for own purposes. It will be set up onto a dedicated root server which is hostet by Hetzner. As virtual environment we will use Proxmox VE (short: PVE).
To be installed Fortinet products
Following Fortinet products will take place in the lab

Hetzner Root Server
On the website https://hetzner.com you can find the server auctions under the menu element “Dedicated”. Here you can find root servers for a lower price.
Root server minimal requirements:
- 3 x 500GB SSDs
- 256GB RAM
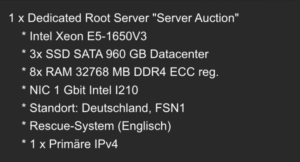
My root server has following specs:

Hetzner vSwitch
- Create a vSwitch with VLAN ID 4000
Hetzner IPsubnet
- From vSwitch order /29 subnet
Proxmox VE Installation
- Go to https://robot.hetzner.com/ -> Server (in the left navigation) and choose your server.
- Click on Support -> Remote Console
- Choose a date which suits to you and set 3h duration
- In the comment field enter instructions that you need a mounted USB stick which has the Proxmox VE installation on it. Also ask for booting to the installation menu of Proxmox VE.
- Currently, we are using Proxmox 8.0.2 since the latest version isn’t compatible with Fortinet products (written on 16.12.2023)
- Template for instructions to copy to the comment field
- Dear Hetzner Team, kindly mount an USB stick to this server which is bootable and has following image on it: https://enterprise.proxmox.com/iso/proxmox-ve_8.0-2.iso. Also kindly restart the server so I can see the Proxmox install guide. Thanks a lot.
- Install pve
- disk: zfs RAID1
- Hostname: if you own a domain enter a subdomain of it as hostname
- If you enter a password don’t forget that keyboard types in English layout
- Avoid using z, y and any symbols
- Use a simple password but change immediately after completing installation

Proxmox VE Repository
- In the sources.list the default repositories are for PVE Enterprise
- Since we are going to use it without enterprise license we have to change the soureces
- Login per ssh to Proxmox
- nano /etc/apt/sourses.list
- remove all lines
- add following lines
deb http://deb.debian.org/debian bookworm main contrib
deb http://deb.debian.org/debian bookworm-updates main contrib
# security updates
deb http://security.debian.org/debian-security bookworm-security main contrib
- nano /etc/apt/sources.list.d/ceph.list
- remove all lines
- add following line
- deb http://download.proxmox.com/debian/ceph-quincy bookworm no-subscription
Proxmox VE Configuration
- General
- Change password
- Add 2FA
- Network
- Copy data from linux briodge and remove bridge
- Input data from bridge to physical port
- Create Linux VLAN
- Name: vlan[VLAN ID]
- Vlan raw device: [name of physical link]
- Comment: WAN
- Create Linux Bridge
- Bridge Port: vlan[VLAN ID]
- Create Linux Bridge
- Comment: intern
- Click Apply Configuration

Create FortiGate VM
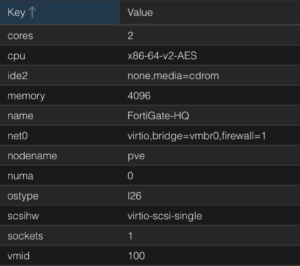
- Create VM
- Set Name (e.g. FortiGate-HQ)
- OS: Do not use media
- Disks: Remove disk
- CPU: 1 Socket and 2 Cores
- Memory: 4096

Download & Mount FortiOS image
- Login to https://support.fortinet.com/
- Support -> VM Images -> Select Platform: KVM -> Download FGT_VM64_KVM-vX.X.X.F-build2463-FORTINET.out.kvm
- Copy FortiOS image
- Use scp to copy the image to proxmox /tmp folder
- SSH to Proxmox
- cd /tmp
- qm disk import [VM ID] fortios.qcow2 local-zfs
- Prepare VM
- On Proxmox GUI
- Hardware -> double-click Unused Disk 0 -> Add
- FortiGate VM -> Options -> Boot Order -> disable ide2 and net0, enable scsi0
- On Proxmox GUI
Configure FortiGate VM
- Start VM
- Login with user: admin – password: [empty]
- Set new password (hint: keyboard layout is set to QWERTY)
- As following we will config network settings (source: https://docs.fortinet.com/document/fortigate-private-cloud/7.4.0/vmware-esxi-administration-guide/615472/configuring-port-1)
- Configure port1
config system interface
edit port1
set mode static
set ip [3rd IP from Hetzner Subnet] 255.255.255.248
next
end
- Configure default gateway
config router static
edit 1
set device port1
set gateway [2nd IP from Hetzner Subnet]
next
end
- Test internet connection
- execute ping 8.8.8.8
- execute ping www.heise.de (to test dns)
- Verify visiting https://[fortigateip] and login in is working
Register licenses
- Visit https://support.fortinet.com
- Go to Products -> My Assets -> Register more
- Enter your registration code
- Select your End User Type
- Enter Product Description (e.g. PVE-FortiGate-HQ)
- Download license file
- Visit FortiGate GUI and log in
- Upload license
- Disable automatic patch upgrades
- Change password to a more secure password
- System -> Settings
- Set Hostname (i.g. FortiGate-HQ)
- Set Time zone to your local time zone
- Set Idle timeout to 60
Create & Import FortiGate SSL Cert in your Browser
- Login to FortiGate
- Go to System -> Certificates -> Create -> Certificate
- Follow instructions to create a Let’s encrypt certificate
- Certificate name: [Hostname of FG (see upper left corner]
- Domain: (e.g. fg.your-domain.com)
- For your subdomain set an A Record with the FortiGate public IP
- Email: (enter your personal email)
- Download Certificate and import to your local pc
- Go to System -> Settings -> Administrative Settings -> HTTPS server certificate
- Set the created certificate
- Restart browser
- HTTPS error should be resolved
Network Config on Proxmox for FortiGate
- On your Proxmox go to FortiGate VM
- Go to Hardware
- Add: Network Device
- Select under “Proxmox VE Configuration” created network device for internal network
Network Config on FortiGate
- Log in to FortiGate
- Go to Network -> Interfaces
- The created network device should be visible
- Edit the new created network
- Addressing mode: manual
- Set an IP address and mask (e.g. 192.168.10.0/255.255.255.0)
- Enable DHCP Server and set range (e.g. 192.168.10.100 – 192.168.10.199)
Network Config on Proxmox for Ubuntu Server
- On your Proxmox go to FortiGate VM
- Go to Hardware
- Remove existing Network Device
- Add: Network Device
- Select under “Proxmox VE Configuration” created network device for internal network
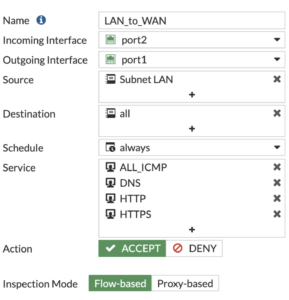
Create Firewall Policy for LAN to WAN

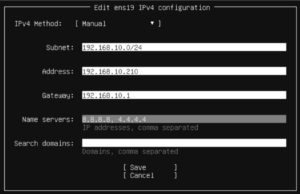
Install Ubuntu Server


- After install
- Boot Order: enable hard disk and disable all other options
- remove ISO under Proxmox -> Ubuntu VM -> Hardware
Create Management Network
- For segmentation purposes create a new Linux bridge under Proxmox -> System -> Network -> Create and enter “Management” as Comment
Create VM for FortiAnalyzer
- Set Name (e.g. FortiAnalyzer)
- OS: Do not use media
- Disks: Remove disk
- CPU: 1 Socket and 2 Cores
- Memory: 4096
- Network: Select Management Bridge
Download & Mount FortiOS image
- Login to https://support.fortinet.com/
- Support -> VM Images -> Select Platform: KVM -> Product: FortiAnalzer
- Copy FAZ image
- Use scp to copy the image to proxmox /tmp folder
- SSH to Proxmox
- cd /tmp
- qm disk import [VM ID] faz.qcow2 local-zfs
- Prepare VM
- On Proxmox GUI
- Hardware -> double-click Unused Disk 0 -> Add
- FortiGate VM -> Options -> Boot Order -> disable ide2 and net0, enable scsi0
- On Proxmox GUI
Configuring initial settings
- Follow Fortinet’s Guide to configure the inital settings: https://docs.fortinet.com/document/fortianalyzer-private-cloud/7.4.0/kvm-administration-guide/71400/configuring-initial-settings
